
SAP EWM Custom RF Screen Configuration: Complete Step-by-Step Guide
SAP Extended Warehouse Management provides the Radio Frequency Framework for executing warehouse activities through RF scanners and mobile devices. The framework allows organisations to customise RF screens, create customer-specific menu structures, define logical transactions, control navigation and adapt screen layouts for different presentation devices
In this blog, we will configure a custom RF functionality consisting of four screens:
| Business screen | Logical step | Screen number |
|---|---|---|
| Scan Handling Unit | ZCUS01 | 9000 |
| Verify HU Details | ZCUS02 | 9001 |
| Enter Decision | ZCUS03 | 9002 |
| Review and Submit | ZCUS04 | 9003 |
All four steps will be controlled through one custom logical transaction:
Logical Transaction: ZFUNC01
Business Requirement
Assume that the warehouse requires a custom RF process for HU verification.
The warehouse operator must:
- Scan a handling unit.
- Verify product, quantity and bin information.
- Enter a verification decision.
- Review the entered details and submit the transaction.
Sample Test Data
| Field | Sample value |
|---|---|
| Warehouse Number | 1710 |
| RF User | EWM_RF01 |
| Resource | RFRES01 |
| Presentation Device | ZRF_8X40 |
| Handling Unit | 800000123456 |
| Product | FG-100045 |
| Quantity | 10 EA |
| Source Bin | GR-ZONE-01 |
| Destination Bin | QA-01-01 |
| Verification Result | ACCEPT |
1. Development of the Custom RF Screens
The ABAP development team must first prepare the technical objects required by the RF configuration. A practical development package could contain the following objects:
| Object | Example |
|---|
| Package | ZSCM_EWM_RF |
| Function Group | ZFG_EWM_RF_CUSTOM |
| Generated Screen Program | SAPLZFG_EWM_RF_CUSTOM |
| Screen 1 | 9000 |
| Screen 2 | 9001 |
| Screen 3 | 9002 |
| Screen 4 | 9003 |
| Global RF Structure | ZS_EWM_RF_CUSTOM |
| PBO Function Modules | Z_RF_CUS01_PBO to Z_RF_CUS04_PBO |
| PAI Function Modules | Z_RF_CUS01_PAI to Z_RF_CUS04_PAI |
Screen 1: Scan Handling Unit
Logical Step: ZCUS01
Screen Number: 9000
Suggested fields:
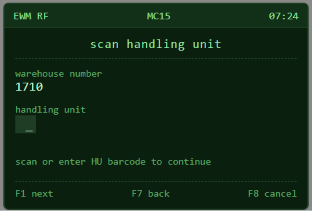
The operator scans or enters the HU number.
The PAI logic should:
- Validate whether the HU exists.
- Check whether the HU belongs to the logged-on warehouse.
- Read the product, quantity and current-bin information.
- Return an error if the HU is invalid or locked.
- Navigate to
ZCUS02after successful validation.
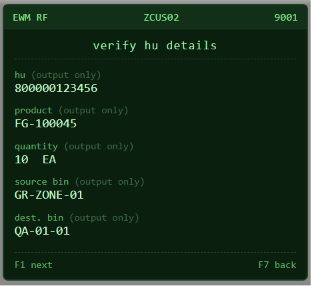
Screen 2: Verify HU Details
Logical Step: ZCUS02
Screen Number: 9001
Suggested display:
Most of these fields should be output-only because they are populated by the application logic.
The screen can allow the operator to verify the data before proceeding.
Screen 3: Enter Verification Decision
Logical Step: ZCUS03
Screen Number: 9002
Suggested fields:
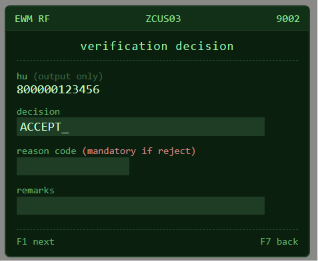
The PAI function should:
- Validate the entered decision.
- Make the reason code mandatory for rejection.
- Store the entered values in the global RF application structure.
- Navigate to the review screen.
Screen 4: Review and Submit
Logical Step: ZCUS04
Screen Number: 9003
Suggested display: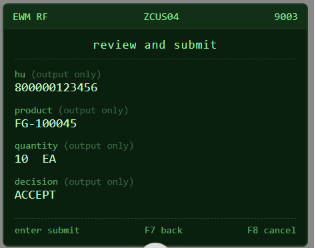
When the operator selects Submit, the system should:
- Perform final validation.
- Update the required custom or standard EWM object.
- Save the transaction.
- Issue a success message.
- Clear the transaction data.
- Return to Screen 1 or the RF menu.
2. Understanding PBO and PAI
PBO and PAI are often confused with foreground and background processing. They are related concepts, but they are not the same.
PBO: Process Before Output
PBO runs before the screen is displayed.
Typical PBO responsibilities include:
- Setting the screen title.
- Reading and displaying values.
- Filling output fields.
- Clearing fields during initialisation.
- Enabling or disabling input fields.
- Preparing labels and screen attributes.
Example function module :Z_RF_CUS01_PBO
PAI: Process After Input
PAI runs after the user enters data or selects a function.
Typical PAI responsibilities include:
- Validating scanned values.
- Reacting to Enter or a pushbutton.
- Updating the application structure.
- Saving business data.
- Determining the next logical step.
- Raising validation or error messages.
Example function module: Z_RF_CUS01_PAI
PBO/PAI Versus Foreground/Background
These concepts should not be treated as interchangeable.
| Concept | Meaning |
|---|---|
| PBO | Prepares information before screen display |
| PAI | Processes user input or a user action |
| Foreground | The next logical step is presented to the operator |
| Background | The next step is processed without displaying its screen |
| Background Function Code | Function code automatically used when processing a background step |
3. Create the Global Application Parameters
The custom screens require a common structure so that data can be passed between the four logical steps.
IMG Path
Create an application parameter such as:
| Application parameter | DDIC type | Purpose |
|---|---|---|
| ZRF_S_CUS | ZS_EWM_RF_CUSTOM | Main data structure |
| ZRF_V_MODE | Suitable custom element | Processing mode |
| ZRF_T_MSG | Custom table type | Optional message information |
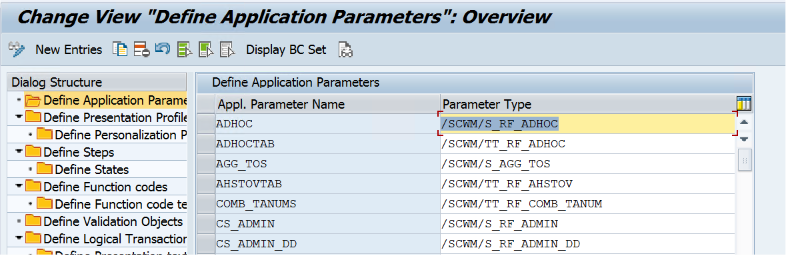
Where possible, use existing SAP EWM data elements instead of creating basic CHAR fields.
The application parameters must also be included as changing parameters in the respective custom RF function modules using the interface expected by the RF Framework. SAP’s own implementation example follows the sequence of defining application parameters before configuring logical steps, function codes and screen mapping.
4. Define the Logical Steps
A logical step represents a stage in the RF transaction. It is not the physical screen number.
IMG Path
Create the following entries:
| Step | Description |
|---|---|
| ZCUS01 | Scan Handling Unit |
| ZCUS02 | Verify HU Details |
| ZCUS03 | Enter Verification Decision |
| ZCUS04 | Review and Submit |
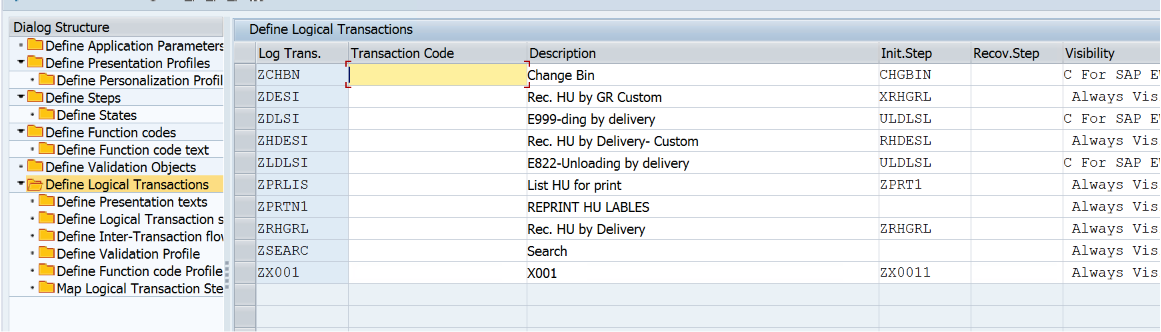
5. Define the Logical Transaction Step Flow
For every relevant combination, define:
- Logical transaction
- Current logical step
- Function code
- Processing function module
- Next logical step
- Foreground or background behaviour
- Background function code, where required
A simplified example is shown below.
| Transaction | Current step | Function code | Function module | Next step | Mode |
|---|---|---|---|---|---|
| ZFUNC01 | ZCUS01 | INIT | Z_RF_CUS01_PBO | ZCUS01 | Foreground |
| ZFUNC01 | ZCUS01 | ENTER | Z_RF_CUS01_PAI | ZCUS02 | Foreground |
| ZFUNC01 | ZCUS02 | ZNEXT | Z_RF_CUS02_PAI | ZCUS03 | Foreground |
| ZFUNC01 | ZCUS02 | BACKF | Z_RF_CUS02_PAI | ZCUS01 | Foreground |
| ZFUNC01 | ZCUS03 | ZNEXT | Z_RF_CUS03_PAI | ZCUS04 | Foreground |
| ZFUNC01 | ZCUS03 | BACKF | Z_RF_CUS03_PAI | ZCUS02 | Foreground |
| ZFUNC01 | ZCUS04 | ZSUBM | Z_RF_CUS04_PAI | ZCUS01 | Foreground |
| ZFUNC01 | ZCUS04 | BACKF | Z_RF_CUS04_PAI | ZCUS03 | Foreground |
| ZFUNC01 | ZCUS04 | ZCANC | Z_RF_CUS04_PAI | ZCUS01 or Menu | Foreground |
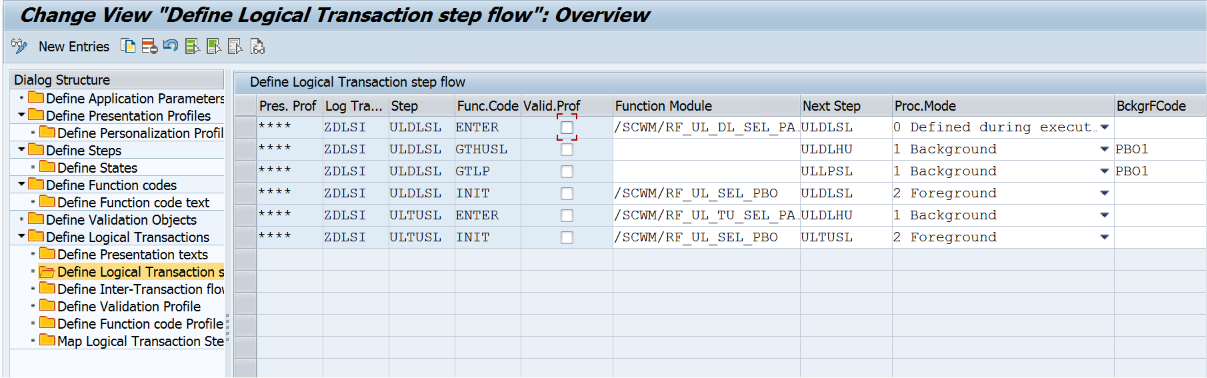
INIT, ENTER, BACKF, background-function-code and next-step behaviour should be designed by copying and analysing a comparable standard SAP logical transaction in the same release.6. Define Custom Function Codes
A function code represents an action that can occur within the RF transaction.
SPRO → SAP Reference IMG → Extended Warehouse Management → Mobile Data Entry → Radio Frequency (RF) Framework → Define Steps in Logical Transactions → Define Function Codes
| Function code | Purpose |
|---|
| ZNEXT | Continue to the next screen |
| ZPREV | Return to the previous custom screen |
| ZSUBM | Submit the final transaction |
| ZCANC | Cancel the custom process |
| ZRESET | Clear the entered information |
Standard function codes such as ENTER and BACKF can be reused where suitable.
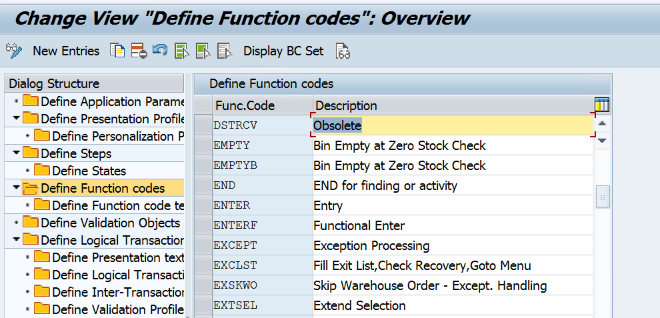
Check the function-code field length available in your system before finalising the names. For example, ZSUBM may be safer than a longer name such as ZSUBMIT.
7. Define Function Code Texts
Defining a function code does not automatically create a visible button label. The text must be maintained separately.
SPRO → SAP Reference IMG → Extended Warehouse Management → Mobile Data Entry → Radio Frequency (RF) Framework → Define Steps in Logical Transactions → Define Function Code Texts
Example:
| Function code | Language | Presentation profile | Personalisation profile | Size | Text |
|---|---|---|---|---|---|
| ZNEXT | EN | ZRF01 | ** | 8 | Next |
| ZPREV | EN | ZRF01 | ** | 8 | Back |
| ZSUBM | EN | ZRF01 | ** | 8 | Submit |
| ZCANC | EN | ZRF01 | ** | 8 | Cancel |
Example:
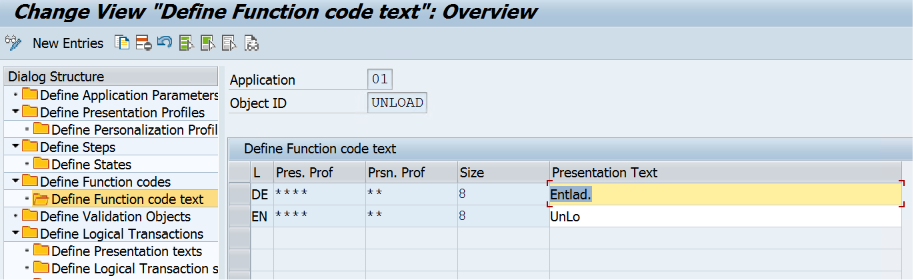
Use the actual presentation and personalisation profiles configured in the project. Wildcard entries can be used where one text should apply broadly.
8. Define the Function Code Profile
The function code profile determines which buttons are available on each screen and where they appear.
SPRO→ SAP Reference IMG→ Extended Warehouse Management→ Mobile Data Entry→ Radio Frequency (RF) Framework→ Define Steps in Logical Transactions→ Define Function Code Profile
| Transaction | Step | Function code | Pushbutton | Function key | Shortcut |
|---|---|---|---|---|---|
| ZFUNC01 | ZCUS01 | ENTER | 1 | F1 | 01 |
| ZFUNC01 | ZCUS01 | BACKF | 2 | F2 | 02 |
| ZFUNC01 | ZCUS02 | ZNEXT | 1 | F1 | 01 |
| ZFUNC01 | ZCUS02 | BACKF | 2 | F2 | 02 |
| ZFUNC01 | ZCUS03 | ZNEXT | 1 | F1 | 01 |
| ZFUNC01 | ZCUS03 | BACKF | 2 | F2 | 02 |
| ZFUNC01 | ZCUS04 | ZSUBM | 1 | F1 | 01 |
| ZFUNC01 | ZCUS04 | BACKF | 2 | F2 | 02 |
| ZFUNC01 | ZCUS04 | ZCANC | 3 | F3 | 03 |
Example:
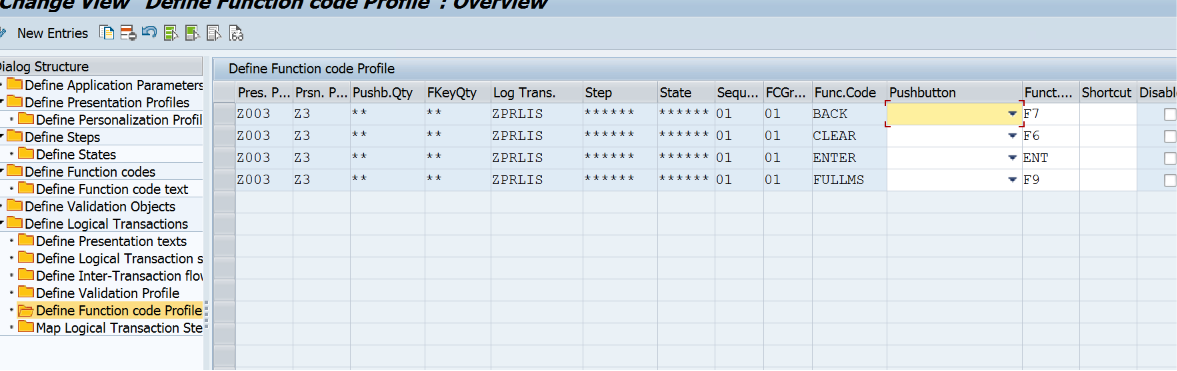
Each pushbutton position, function key and shortcut must be unique within the relevant logical step.
SAP’s configuration example demonstrates that the function-code profile controls values such as pushbutton position, function key and shortcut for a logical transaction and step.
10. Map Logical Steps to Custom Subscreens
The RF Screen Manager connects the logical transaction and logical step to the actual ABAP screen.
SPRO → SAP Reference IMG → Extended Warehouse Management→ Mobile Data Entry→ Radio Frequency (RF) Framework→ RF Screen Manager
| Logical transaction | Logical step | State | Sequence | Screen program | Screen |
|---|---|---|---|---|---|
| ZFUNC01 | ZCUS01 | ****** | 01 | SAPLZFG_EWM_RF_CUSTOM | 9000 |
| ZFUNC01 | ZCUS02 | ****** | 01 | SAPLZFG_EWM_RF_CUSTOM | 9001 |
| ZFUNC01 | ZCUS03 | ****** | 01 | SAPLZFG_EWM_RF_CUSTOM | 9002 |
| ZFUNC01 | ZCUS04 | ****** | 01 | SAPLZFG_EWM_RF_CUSTOM | 9003 |
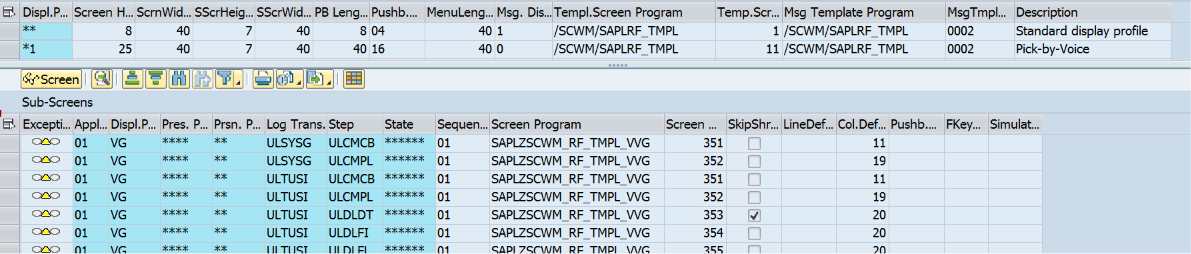
Once configured , it will start reflecting on the logical transaction screen setup under – Map Logical Transaction Step to Sub-Screen
